Its a sad day but I have decided to abandon Redic Iron and Steel. With my illness I find it too difficult to lift the board onto the table. I will now let all the 0-16.5 stock and buildings go. If anyone is interested in any of the items please message me. I will shut down this blog at the end of the month and wish to thank all of you for following this blog and you kind comments.
Tuesday, 23 March 2021
Sunday, 2 August 2020
Bit More progress With The Milk Train
Just a few photos showing the progress on the milk train. 2 wagons have their roofs fitted and now need their chassis fixed and painted and couplings. The flat wagon with tractor is a scratch built flat to no particular plan. All other wagons have been body kits from the internet. 2 more to be built over the next few days which will see the train complete. It is posed on my old photo diorama which is a bit scruffy after about 12 years of use, a couple of photos included. Annie, No4, is in charge and just about to leave Castell Bronwen. I think the train with 2 more vans will be about the right size for the perishables train.


Another Couple of Weeks - It started with a Milk Wagon
As I said last time I was building a 422 Milk Van (available on Fleabay). The history of my fictitious line has been amended so that when the Act of Parliament was issued an amendment was added ensuring that Redic Iron and Steel would operate both goods and passenger trains between Bridgwater and Holford (the 2 termini). The milk train runs from Holford to Bridgwater just after 16:00 and picks up churns at all stations and several wayside points. The load can vary and as many as 4 covered wagons can be marshalled. The empties are returned at 07:00 the next day. Annie is the usual choice of loco.


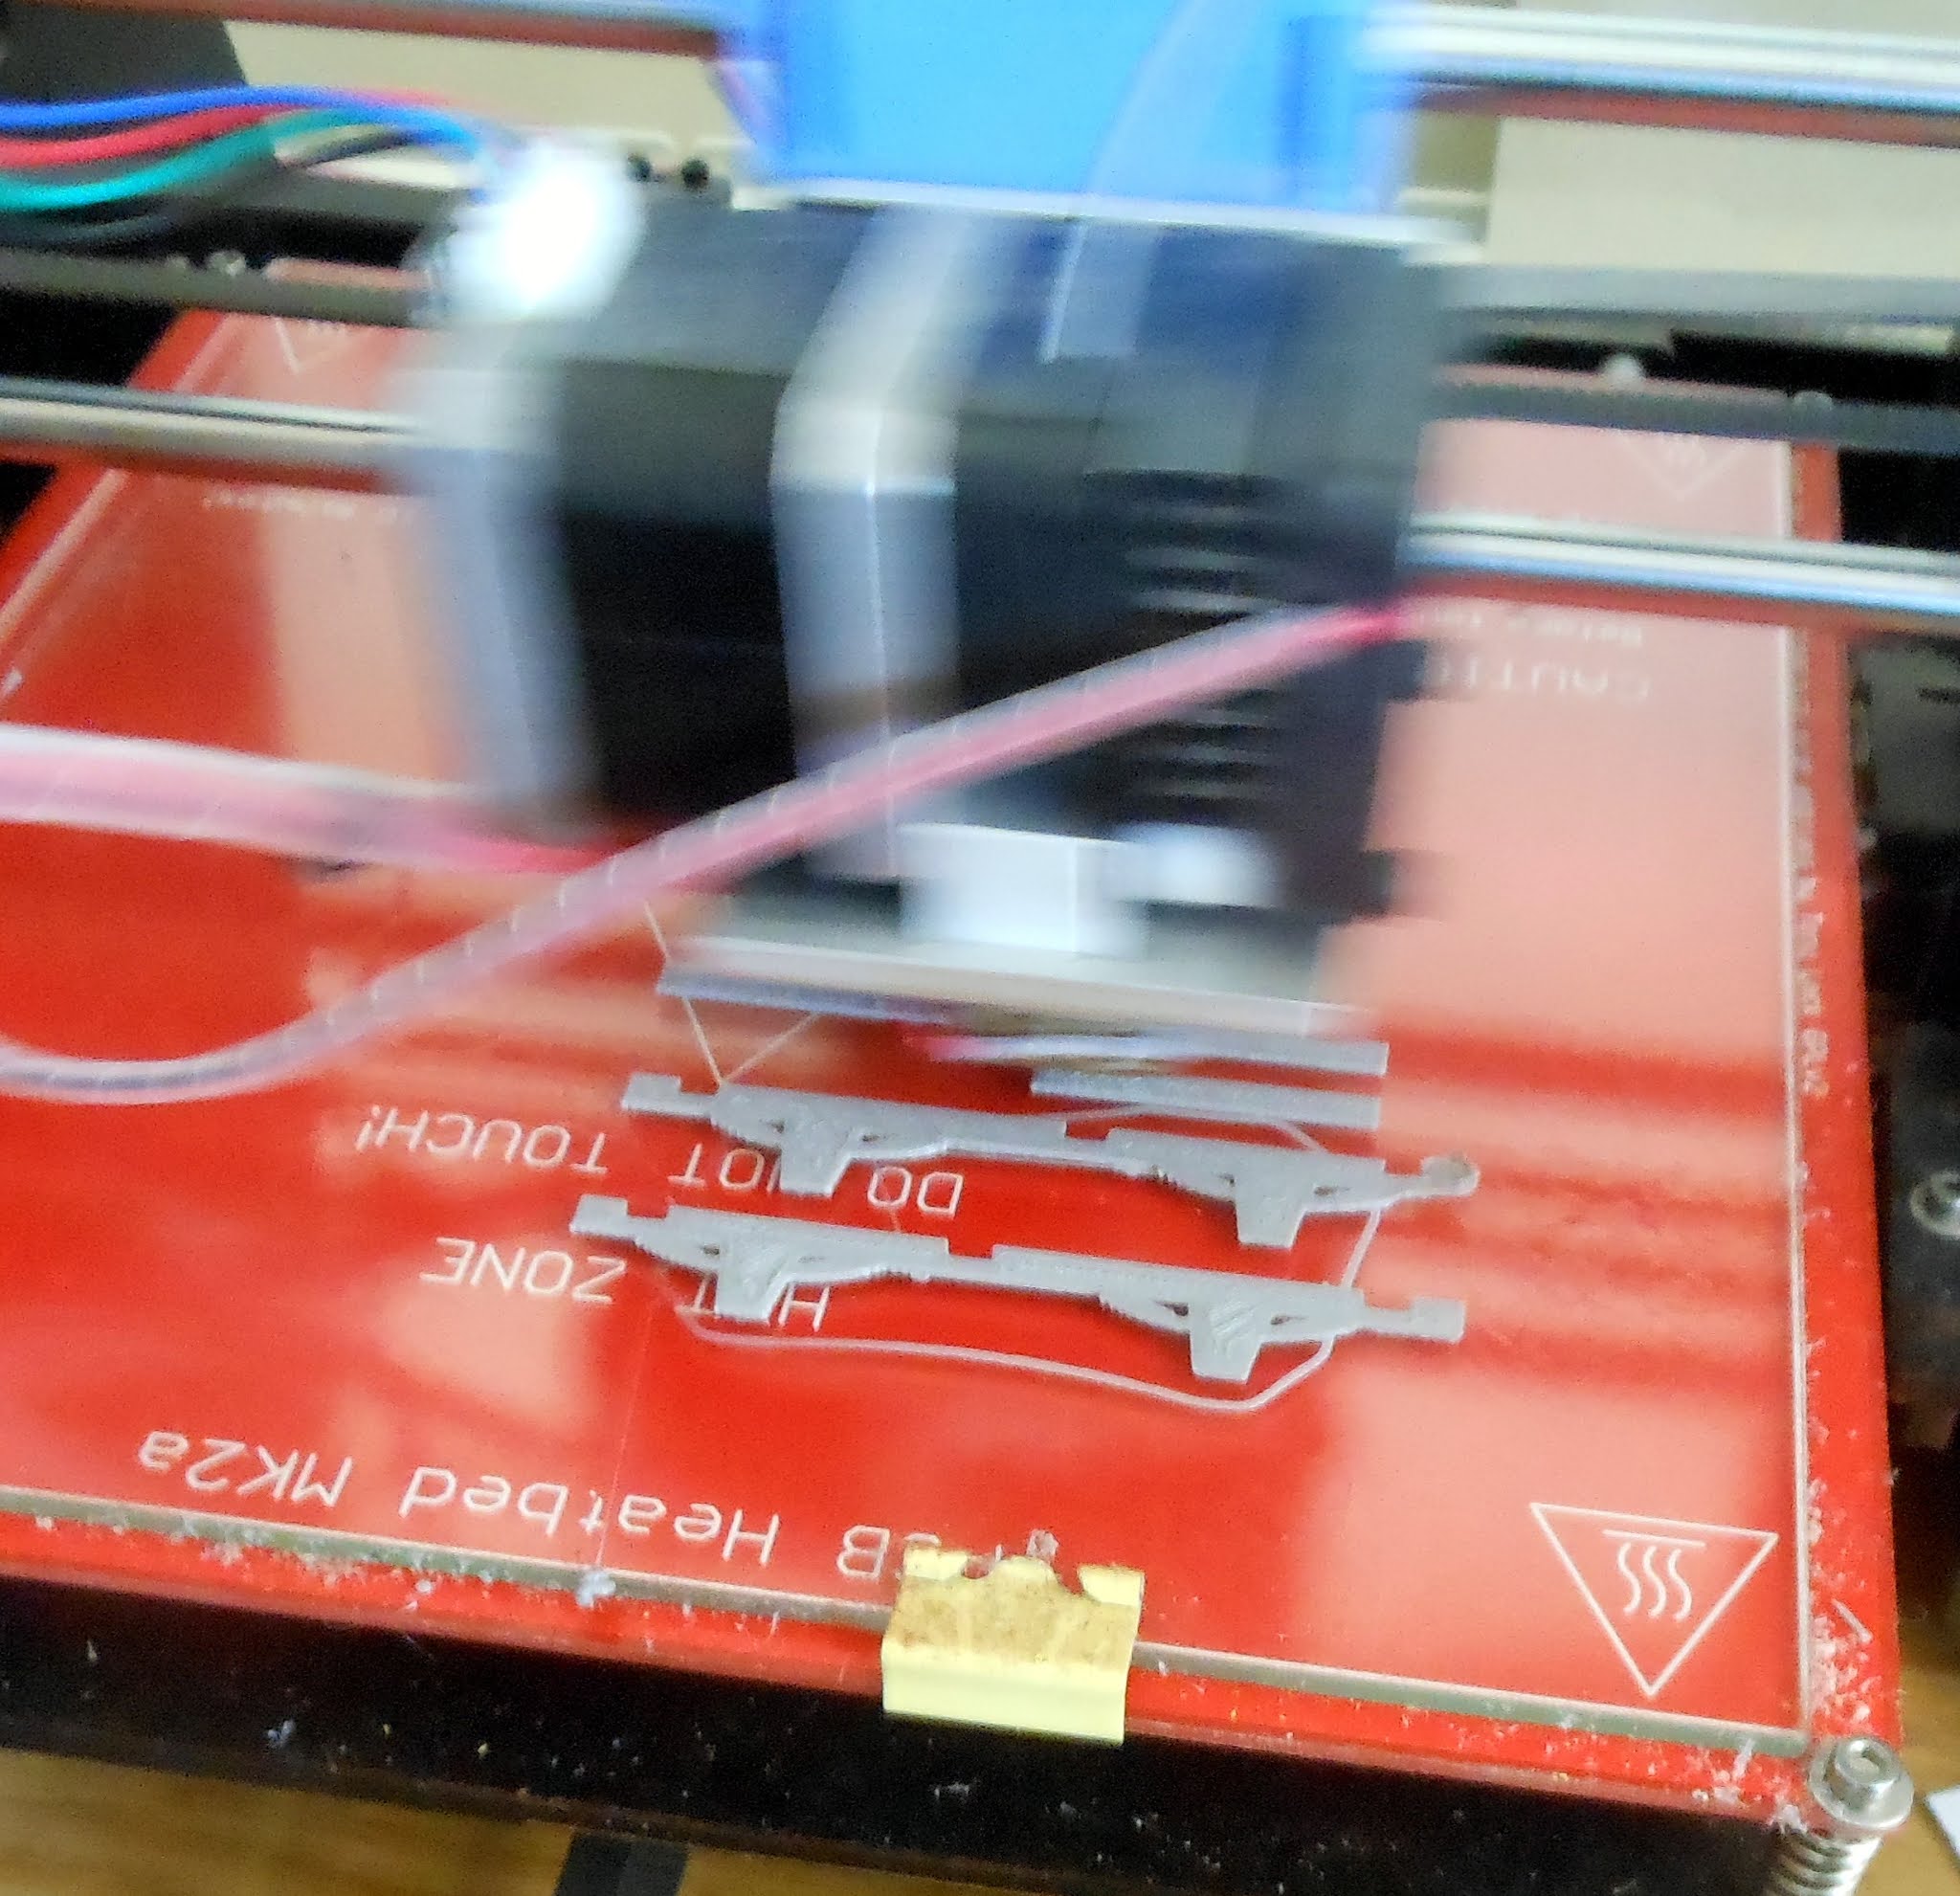
So wagons have sprouted and 46 and 47 have been almost completed (47 is a Milk Van and 46 an ordinary van). Brake B6 is awaiting glazing and a roof and another milk van and a luggage van are waiting to be started. I have just built a flat wagon for carrying farm machines and it currently has a new 1949 tractor loaded. I have tried to portray these wagons as a bit scruffy because the Steel works finds it difficult to make a profit so maintenance is not a high priority. Must get the layout wired so this train can be shown off. The 3D printer is busy making chassis.


Hello Again,
I have been unable to write for about 4 weeks. Suffice to say that fixing cancer is a hard and rocky road but I am progressing. I am feeling better and am modelling again, but only slowly.
Firstly I had a bit of good luck when I noticed a Bachmann Spectrum (0N-30) 16 Ton Shay on that well known auction site. It was marked as spares or repair and DCC Ready. The advert said many parts were missing but it ran well. I already have one Shay waiting to be converted to the Bilston Shay (difficult to convert a Class A to a Class C). However I decided that a scruffy one would make a good source of spares. It was listed as £30 Buy it Now so I pressed the button and was told if I used a voucher I would get £10 off. I pressed another button and a £20 Shay duly arrived. What a bargain it works well and most broken bits have been re-glued. Here is a photo of it resprayed and waiting a small repair to a drive shaft and a new oil fuel tank.

Next I noticed 422 was advertising a freelance milk wagon as the last of their variations on their long wheelbase wagon. I loved it so ordered one. I have built the body and hand painted it using Lifecolour Acrylic. A joy to use giving a smooth matte coat after 2 coats. I have also snapped up another variation to build as a brake van.


Looking forward to Sunday when our 0 gauge club reopens the running days and will be running in my Dapol 14XX (oooppps wrong track gauge).
Just a short note to say I have been quite poorly for the last few weeks so no work carried out. It appears that the immunotherapy which keeps my cancer at bay has knocked out my adrenal glands. I should be back to rights soon. Sorry for the lack of info but nothing has happened. Ken
Tuesday, 14 July 2020
Diesel Flirtation
I am predominately a steam man but the other day bough a Fleischmann O&K 00 scale diesel shunter very cheaply. It has had a service and now is about to join the ranks of the Redic locos. I have already named it Weasel the Diesel so nameplates are on order (just Weasel).  up hill.
So we begin by finding a possible prototype to model and after looking for a while a 1933 vintage machine came to mind. I will not say for now who built this originally to see if you can guess. Suffice to say the merry engineers at Redic have put a new cab on it because the Weasel driver was complaining about the uncomfortable, and sometimes very wet seat.
As usual I start by making the running plate in 2mm HIP plasticard. 
 I make these on the tight side and adjust them to clear all the gears and electrics. Trimming off the plastic in thin layers until everything is snug.


I needed to trim 5 mm from one end of the Fleischmann chassis and this was sawn off and filed flush. A good tip is to put the chassis into a polythene bag except for the bit to be cut off and fit an elastic bad. Therefore no swarf gets into the motor. The cab I fitted is one of the A1 (Doncaster) cabs made for the Bachmann Plymouth and it was this that defined the width of the running plate. When I have a spare hour I will add some rivet detail to the cab and solder the bends to make it stiffer. I will solder the seem and roll the roof and then solder that on. The cab fitting will wait until it is painted and glazed, I will also add some controls, a seat and driver.
Now have you guessed the prototype yet? I have made up the first part of the bonnet but not yet added the doors. I have to either buy or 3D print some louvres and boy doesn't Weasel have a few. So let's added the bonnet so far and see if you can guess. You will also notice that the shunter's steps have been added and next on will be the sand boxes. With the main part of the bonnet put in place there are a couple of give aways and if you haven't guessed I need to tell you it is a narrow gauge version of the Armstrong Whitworth diesel electric of 1933-36. In my story Redic bought this machine brand new and soon added a better cab. Loco is mainly used as the standby loco for the blast furnace and is kept busy shuffling iron ore or scrap wagons into the loader. There is a 4 wagon capacity at the loader dock and this little diesel easily manages the 25 ton load even though it is


The eagle eyed among you may have spotted the sand boxes behind this last photo so better set to work and fit them.
Saturday, 27 June 2020
Regular Updates
Round Up 27 June 2020
 I have not been too well the last couple of days so lots of little bits have been done. 2544, the Bagnall-Meyer has had its handrails fitted and painted. The inside of the cab is now painted yellow and I am searching for some yellow pinstripe I have to put wasp stripes on the buffer beams. The handrails are painted with a mix of Gunmetal Metalcoat and Leather at a 2:1 ratio. When thoroughly dry (over night) they are buffed with a Mk 1 finger which leaves that characteristic handrail brownish colour.
 The Crane Tank has the remade tanks and each tank has lead inserts. The weight slows the tank and gives great slow running. The backhead has been printed (good old 3D)
 and the modified boiler will be fitted soon. The foreman has fitted 2 gauge frames to the backhead.
 The layout saw some test running and the 'steel' support for the Fan House fouled the running line. The offending leg has been removed and some 'steel' has produced a brace and another leg across the tracks.
 The great news of the week is the arrival of a small Fleischmann diesel shunter. The body will be binned and an A1 cab, in stock, will be assembled. Then the bonnet will be freelance and the Iron Works will have a standby shunter. The wheels have been cleaned and the mechanism oiled which got rid of the shrieking motor bearing. I have scattered a few photos of the crew of the 2544 checking out the new shunter.
Monday, 22 June 2020
Building a Crane Tank, 0-16.5, on a budget
First you need a chassis
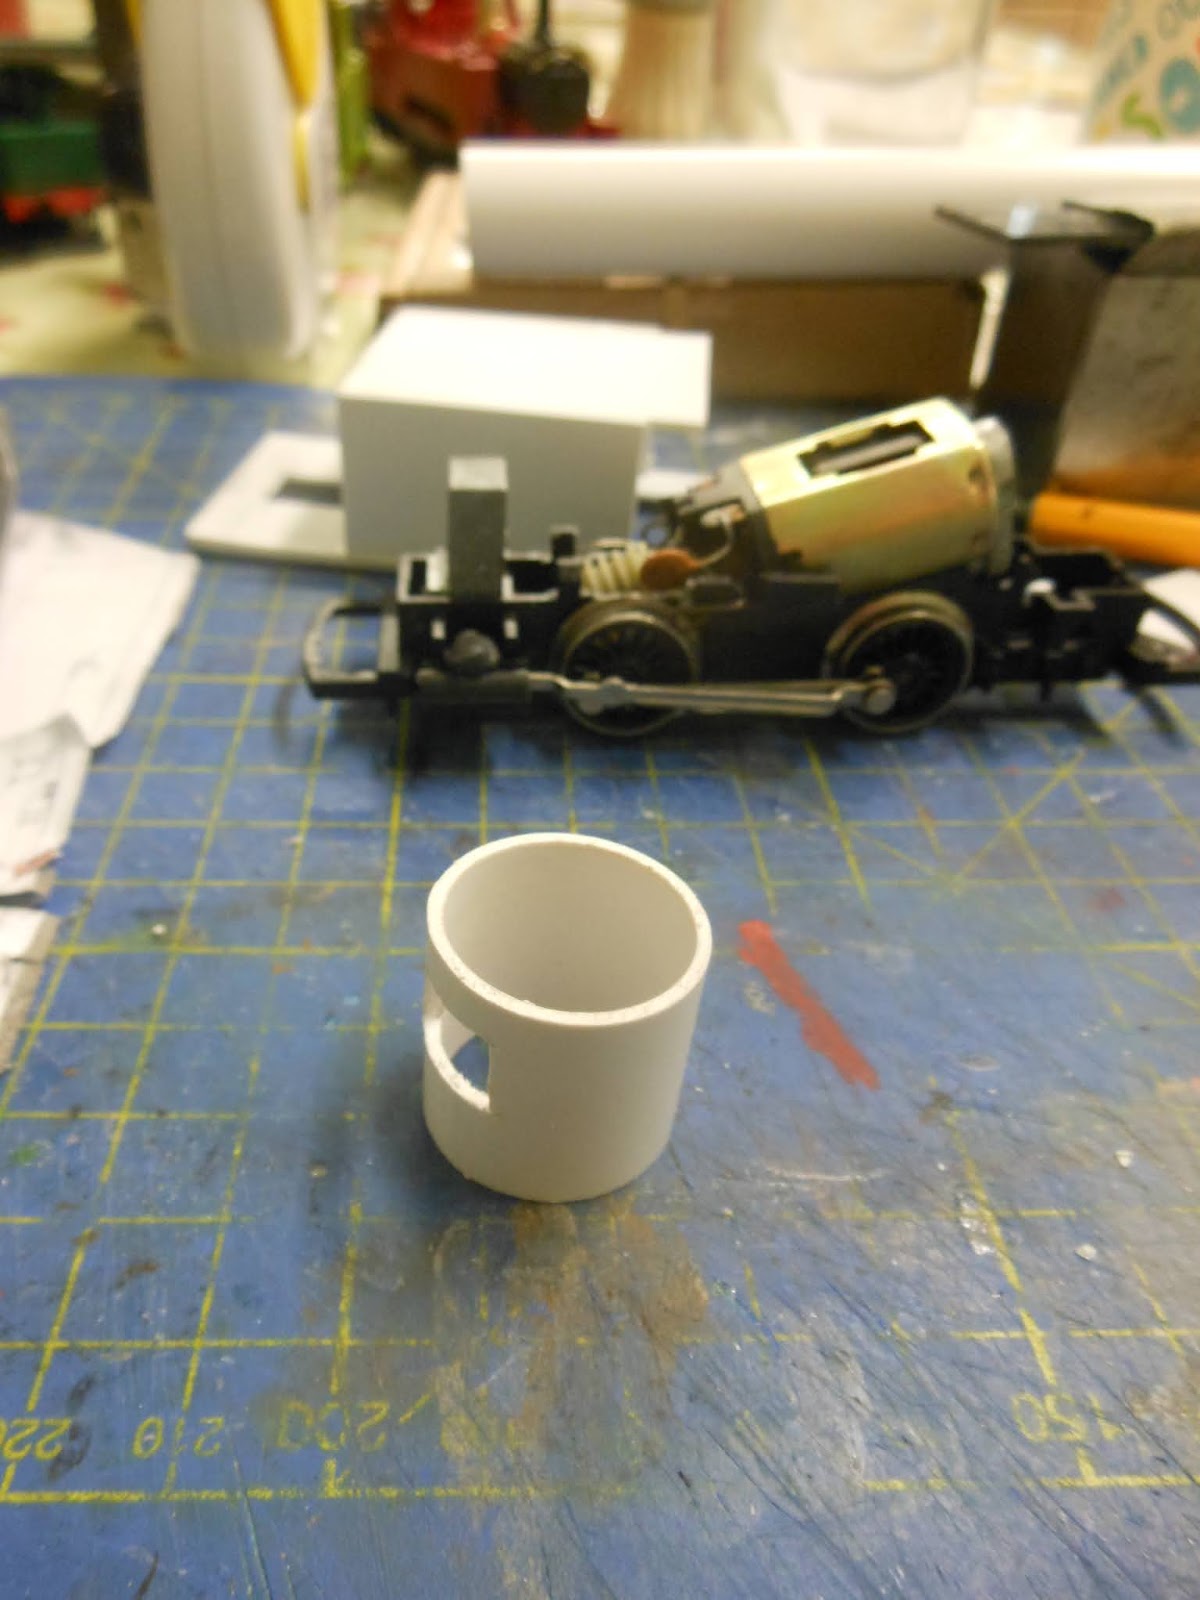
Here is a photo of a Hornby 101 0-4-0 loco chassis. The chassis is not accurate as the wheels are 2' 4" and should be 3' 0" and the wheelbase is wrong. Still it will look right. The running plate is made from 1 mm plasticard with the edges reinforced by some 2 mm x 2 mm angle with rivet detail added. The running plate will be adjusted until the chassis runs free. The boiler will probably made of copper to get the weight. I have ordered some miniature motors to see if I can power the jib.


 The endearing part of this loco, I think, is the low slung boiler. I do not have a working drawing so all is measured from photos. I estimate that the boiler is 3 foot in diameter. This is excellent because my favourite boiler material is 22 mm overflow pipe. You know the stuff it shows if water is overflowing from your toilet cistern. It is about £3 for 2 metres which gives a lot of 0 gauge boilers. Two cuts with a razer saw releases the scale 3 feet's worth of pipe. Now this is where it gets a bit iffy as you have to cut a slot for the weight at the front of the chassis. You could throw the weight away but the crane has to have weight in the counter balance to keep the crane level and then the loco has to be stable when the crane is loaded. You need 1 of those aluminium mitre boxes to cut the pipe, have you got one? No then get one they are cheap and come to the rescue when ever you are cutting small pieces.To cut the slot just cut 2 cuts in the pipe until the saw just breaks through on the inside. Be generous with your dimensions as the body still needs to fit on and off the chassis. Trim out the small piece of waste and dress with a file. Remember the plastic lugs on the chassis locate the body squarely so making some play in this slot will allow the body to fit on and come off without a struggle.
 Now trial fitting, put the body on to the chassis and slip the boiler over the weight. If all went well the boiler should be a smidge lower than the rest of the body, should sit ontop of the plastic lugs and droop down at the front. The droop will be corrected by fixing the boiler to the body but NOT YET. I use a bit of black stuff to hold the boiler to the brace and all is well.

Starting the body work
It is a beautiful morning, I was out of bed at 05:30 and watering the greenhouse. Back at the ubiquitous kitchen table/workspace some 1.5 mm HIP plasticard is cut very accurately. HIP is a better grade of plasticard and is really strong. This part will support the crane so it needs to be strong. Also a few ounces of lead will go inside here. I made the shell in 4 pieces; the 2 sides which are rounded on the leading edge and will be the outside of the side tanks. The top which sits in between the sides and a brace at the front to make everything solid.
Pause for breadth and allow to firm up before doing any more. Test fit to the chassis and it fits great.
 The endearing part of this loco, I think, is the low slung boiler. I do not have a working drawing so all is measured from photos. I estimate that the boiler is 3 foot in diameter. This is excellent because my favourite boiler material is 22 mm overflow pipe. You know the stuff it shows if water is overflowing from your toilet cistern. It is about £3 for 2 metres which gives a lot of 0 gauge boilers. Two cuts with a razer saw releases the scale 3 feet's worth of pipe. Now this is where it gets a bit iffy as you have to cut a slot for the weight at the front of the chassis. You could throw the weight away but the crane has to have weight in the counter balance to keep the crane level and then the loco has to be stable when the crane is loaded. You need 1 of those aluminium mitre boxes to cut the pipe, have you got one? No then get one they are cheap and come to the rescue when ever you are cutting small pieces.To cut the slot just cut 2 cuts in the pipe until the saw just breaks through on the inside. Be generous with your dimensions as the body still needs to fit on and off the chassis. Trim out the small piece of waste and dress with a file. Remember the plastic lugs on the chassis locate the body squarely so making some play in this slot will allow the body to fit on and come off without a struggle.
 Now trial fitting, put the body on to the chassis and slip the boiler over the weight. If all went well the boiler should be a smidge lower than the rest of the body, should sit ontop of the plastic lugs and droop down at the front. The droop will be corrected by fixing the boiler to the body but NOT YET. I use a bit of black stuff to hold the boiler to the brace and all is well.
The next piece will be the smokebox saddle and it will cement the boiler to the running plate. I shall make it with a little clearance so that lugs can be pushed into to disengage the body.
I want to power the crane
 I have spent a few hours worrying about powering the crane on this loco. The motors need to be ultra small because you need 2 motors and the gears have to be really good quality. I ordered 4 x coreless mobile phone vibrator motors and the huge cost of less than a fiver. I am lucky to have a 3D printer so a pair of gears were made and the result was.........................
a little over an inch (28 mm) and means all is OK. The motor, being coreless, does not generate much heat. The no load speed is acceptable on 2 volts so the slewing and chain drums should work well. Silly money really as it will cost about £1.50 per power train.
Think I will spend today designing and test fitting the main slewing mechanism.
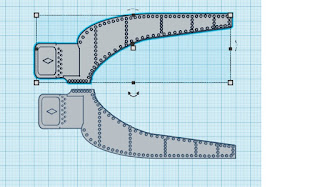
The drawings for the sides of the crane prepared for 3D printing. This took a while to draw so a large cold beer is now due. Here is a picture of the next stage. The 2 sides will take 7.5 hours to print.
 I have just discovered 2 major booboos with the crane locomotive. Firstly the side tanks have rounded ends and secondly the boiler can be seen between the tanks and a plate goes over the boiler to support the crane. So new side tanks have been made and fitted. Making them hollow has provided a void for some lead which I will try tomorrow and see how slowly she will run. A couple of photos shows I am back to roughly where I was yesterday.

As a bit of good luck I have won a couple of Ebays items. Some Kadee No 5 so the locos can be finished off and a Fleischmann 4w diesel shunter which will give up its chassis for a loco. I fancy a Fordson tractor powered shunter or a Sentinal.

 Work is continuing and the boiler is positioned but not fixed yet. Spent some time watch Dubsy on the Foxfield. And things are beginning to look right. Strange arrangement for cab but it will look good in the end.
The drawings for the sides of the crane prepared for 3D printing. This took a while to draw so a large cold beer is now due. Here is a picture of the next stage. The 2 sides will take 7.5 hours to print.

Oooops
 I have just discovered 2 major booboos with the crane locomotive. Firstly the side tanks have rounded ends and secondly the boiler can be seen between the tanks and a plate goes over the boiler to support the crane. So new side tanks have been made and fitted. Making them hollow has provided a void for some lead which I will try tomorrow and see how slowly she will run. A couple of photos shows I am back to roughly where I was yesterday.
As a bit of good luck I have won a couple of Ebays items. Some Kadee No 5 so the locos can be finished off and a Fleischmann 4w diesel shunter which will give up its chassis for a loco. I fancy a Fordson tractor powered shunter or a Sentinal.

 Work is continuing and the boiler is positioned but not fixed yet. Spent some time watch Dubsy on the Foxfield. And things are beginning to look right. Strange arrangement for cab but it will look good in the end.
I have managed a bit of work on 4101 and the following has been fitted: boiler, lower front cab sheet, cab back sheet,


some strengthening underneath and, of course, a temporary chimney. I have decided to call 2544 (the Bagnall-Meyer) Leviathan and the Dubs 4101 will be Goliath a bit of tongue in cheek as she will only lift a ounce or two (2.5 tons in real life). I only realised that the Crane Tank was 4101 and I have used a Hornby GWR 101 chassis.


some strengthening underneath and, of course, a temporary chimney. I have decided to call 2544 (the Bagnall-Meyer) Leviathan and the Dubs 4101 will be Goliath a bit of tongue in cheek as she will only lift a ounce or two (2.5 tons in real life). I only realised that the Crane Tank was 4101 and I have used a Hornby GWR 101 chassis.
I have decided to alter the diabolical valve gear and rods. I will make up new connecting and coupling rods. Fit new cylinders and Joys slide bar and crosshead. I have ordered the brass which has cost about £6 but I think it will make a much better loco.

Started work on the jib. I was going to 3D print the sides but a test print showed it was a poor render. I have made the sides with plasticard and used my ancient riveting tool to add the rivet detail. I am still planning to have the jib powered but it may defeat me. Here of a few photos of the jib shoved in place. I like the overall look of the locomotive and it will be useful in the casting floor of the blast furnace.

 Now I have been thinking about the Smokey Joe chassis. It certainly has its vices not the least being its attempt to emulate a startled rabbit (solveable -electronically). This is the first loco I have built that has a single slide bar arrangement. This morning armed with a sintered diamond file I made the slide bars and started on the crossheads. I will solder up some new rods and make new cylinders with end caps. I may make the cylinders in solid bar as this will add some extra weight although there is already extra lead in the side tanks.
Friday, 19 June 2020
Bagnall 2544
Bagnall Meyer Nears Completion
Work has continued in getting 2544 finished. This morning she has been sprayed and now the brasswork is being added. She now needs some black paint, the cab roof finished and the cab interior done.
I have lubricated all the various shafts that power the 2 bogies and now she runs very well. Here is a little video of her running.
Well 2544, 'Leviathan' is all but finished. She needs crew, windows, coal and works plate and nameplates.

 This will be done over the next few weeks with the nameplates (Narrow Planet) being the last items as they have to be etched. She has been varnished, lightly weathered using weathering powders and varnished again. I use Games Workshop Purity Spray, now called protection varnish I think. The weathering has been aimed at being in service for a few weeks. Very little gloss and brightness but no dirt yet. I am really pleased with the bufferbeams that are pin stripe lining tape. Goes over rivets well and sticks down well. I am waiting on some parts for the crane tank but have the motors
Tuesday, 9 June 2020
Layout and Buildings
The Work So Far


Not a bad day and some work has taken place.


The fan house is starting to come together. The walls are up and the windows trial fitted. I have run out of the self adhesive brick paper so have ordered some more from France. Where the fan house meets the rest of the building I will make some detailed brick work. Eventually all my locomotives and stock will get to run so here is a for taste of what is to come.

The Layout Progress
Today I have finished the track laying. Track is laid on 40mm X 3mm neoprene foam. The relevant insilated fishplates have been added and wiring should start soon. Ballasting will then take place and infilled 'granite setts will be added.


Here is a collage of the working locos for the railway. 2 diesels, 1 petrol and 6 steam. I also have a Bachman Class B Shay that I hope to use to copy the Shay that was in the UK at Bilston. Stewart and Lloyd's Shay was Number I with LIMA on the tender. I will add some local changes and claim it was converted to narrow gauge. More pictures when I start on it.

Another Building
I regular keep an eye on what is coming up on the second hand scene. I was lucky enough to buy up 2 Bachmann HO USA Tank Wagons this week. I like Bachmann freight cars and have used many of their chassis, especially the caboose that Hattons sold very cheaply a few years ago. I dismantled the 2 tanks and earmarked 1 chassis for a coach I have and the second will be converted to an ingot carrier. In my Redic world bot steel and cast iron is produced in ingots that are 3 feet long by 1 foot by 1 foot. This 3 cubic foot ingot weighs 489 pounds. Therefore 9 ingots weigh approximately 2 tons, a good load for a NG wagon.
Now what to do with the bodies. The tanks on the wagons have a section of body as part of the chassis. I did not want to weaken the chassis so modified the rest of the tank to fit flat and constructed a brick built plinth to fit them on. It is still work in progress but here is how far I have got.


The Ingot Carrier
I really liked the idea of this and have 3D printed some more ingots. The chassis from the Bachmann HO Tank Car is a bit of a problem, great bogies but the bottom of the tank is moulded into the chassis. I found I had some 8mm channel plasic and this was cut and mitered and glued to the top of what was once the Tank Car's platform. I then used a piece of 20 thou Plastikard to make a sheet of steel for the ingot carriers deck. I scribed a couple of seams then riveted the edge and double riveted the seams. I then glued the sheet to the top of the channel. I added a few bends to the sheet before glueing on the sheet. I hoped these bends would show some variation that would give the carrier some wear. It was whilst doing this that I noticed that on side channel had been glued in with some inward bowing. I tried paring back the edge of the top sheet but that didn't look right so a 1.5mm strip of 20 thou was glued on the represent an old repair.
Off to the garage for a coat of paint. I have found that most wagons that work around the blast furnace are black and rusty probably due to the intense heat. It was time to try and emulate that finish where the black is densely mottled with fine rust. The wagon was sprayed with satin black with a couple of coats. Immediately the wagon was then sprayed with red primer. The spray is aimed from about a metre or maybe more so that the red primer falls onto the wet black.
Off indoors for a cup of tea and half an hour later the wagon is dry. I have to finish it by adding some securing eyes and a bit of lettering. If you have the facility to enlarge have a go because the wagon deck looks great.


The Special Coach
 Just 2 years ago a very good friend passed away. I was asked to help clear his house and his model railway equipment was donated to the WSR Wagon Restoration Group. Sale of tools and models raised enough money to fully equipe the group with 110V and battery powered woodworking tools. When you sell off somebodies model collection you get left with the contents of drawers that we all have. They are useful......sometime and the pile just gets bigger. Well this coach was inf act a tram car that was probably towed by an enclosed steam tram loco. Time had told on this coach and one end was missing and other bits broken. I did the bare minimum to get it as it should be, repainted the missing an end and finished it ready for narrow gauge. The tank car chassis that was spare was used but it needed lengthening so I cut it at one end as I wanted the weights to remain. It worked very well and now the coach complete with its mostly original paint and transfers is on wheels and ready to go.
The Engine Shed and Fan House

 Work has restarted on the Fan House as a delivery of brick paper has arrived from France. The Fan House needed some fettling to strengthen the joints and the floor of the shed was evened up and the 2 pieces glued together.
Next the pieces of brick work that will cover the gap in the building will be made. The are 4 mm thick made of 2 pieces of plasticard laminated together. There will be matching projections at the top of the Fan House on the long sides. No windows are fitted on the end side because it faces the blast furnace and would not get much light. The photo below shows a heavy steel block that I use for applying weight. The Gorilla glue I use is set in 30 minutes but will take until tomorrow to get to full strength. As soon as I can handle it the rest of the brick paper can be added. This brick paper I get from France via Ebay. It is photographs printed onto thin vinyl and is self adhesive. When finished I mask off the windows and spray with Purity Spray to protect and get a matte finish. The building can then have weathering applied.

 |

 Well the bottom is complete except for the corners. The extra brick wall width would have been added to reinforce the structure and is in keeping with the extension above the original fan room. The plinth is bonded on with superglue because it is difficult to get plastic glue to gold the foam board paper. Here are a few photos of the work so far. Next will be the upper plinth and the shed roof. The shed will be galvanised iron and then the tiled roof will be added to the fan room. There may be internal equipment on the floors, have 3D printed a sizeable electric motor. Will need some plenum and pipe outlets next. Have also printed some 'Xs and Ss' to show some strengthen to the upper building.
 A bit more work on the shed and fan house. The window cills have all been fitted. The rafters for the shed roof have been made and glued in. I have decided to use the gas storage tanks as water storage and a 'steel' frame has been built to fit the tanks above the roof as per several NCB installations. Most of the corrugated roof has been fitted and when the water tanks are fitted the roof will be finished. The 3D printer has been used to make some brackets for the water crane that will be fixed to the shed wall.
 Some extra photos of the building which should finish next week and then be weathered and cluttered with the usual discarded bits and pieces.


The roof of the fan house has been built and added. I used some ABS plastic pantiles that I bought at the Bristol GOG meeting a couple of years ago. It

Now this was going to be a difficult painting job. The hip joints have had small tube glued on the simulate ridge tiles and that looks good. Now back to painting.


Subscribe to:
Comments (Atom)